Hey everyone,
Due to the fact that I haven't had enough time recently to work on new tutorials, I'm posting two polls below so you can request a series of tutorials, which will let me stay on one specific topic and create more tutorials in a faster time.
So, be sure to vote on the polls above and I'll check out the results soon and start working on the series of tutorials that the majority of the voters select.
Thursday, May 5, 2011


Wednesday, March 23, 2011
SmartFoxServer Tutorial: Moderator Message Tutorial
Hello everyone.
To start off this post, I'm going to tell you this: I plan to start updating this site much more as time passes by. I'd also like to apologize for not posting this tutorial sooner than I had expected.
Anyway, let's just jump right on into the tutorial.
In this tutorial, I'll be showing you how to make a "Mod Message" system. I will be using SmartFoxServer objects again because some people requested that in the "Mod Magic" tutorial I did not to long ago.
So, the first thing I want to tell you is that I'm using the SmartFoxSerer avatarChat file for this tutorial, but you can use any file you want. So, let's go ahead and open up the file.
The next thing you will want to do is to skip straight into the "chat" frame (on the avatarChat.fla example file) or whatever frame your users will interact with each other and open up the coding for that frame.
Now, in this area (at the very bottom of all the other coding), we are going to add this coding into our file:
We are also going to go right under that and make a new function named "sendModMessage." So, in order to do that, we need to add this coding under the smartfox.onObjectReceived handler:
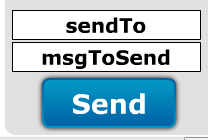
Now, if you tested your movie right now, you would see that nothing has changed. So at this moment, adding all that coding hasn't been really useful yet. It's time to change that and tie all that coding together. To do that, first we need to make a button to call the 'sendModMessage' function. You can give the button (or movieclip) any instance name you want.
Now that something is calling the function, we need some visual evidence that it is really being called. So, the next thing to do is to create a movieclip and give it the instance name of 'modMsgMC'. Inside that movieclip, go ahead and create a dynamic text field which will be used as the actual 'message' part of the 'mod message'. Give this text field an instance name of 'modMsgText'.
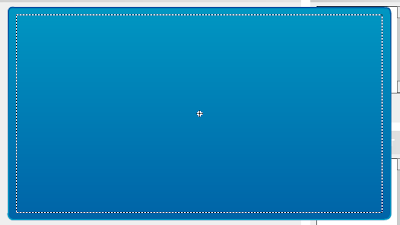
After you do that, test your movie and you should see that the moderator message is working completely fine.
Now, currently, as you can see from the file your making, the user is being defined by you and cannot change, as well as the message. So, my next objective is to show you how to alter the coding so you can type in the user's name and the message to send to them.
The first the you have to do is create two text fields on the stage. Give them instance names of 'sendTo' and 'msgToSend'.
Now, once that is done, just open up the button coding which calls the sendModMessage function, and change it to this:
Test your movie with TWO instances, and you should see your moderator message working fine. I didn't show you how to add a close button to the moderator message, but a simple one could have this coding:
Well, that's all for this tutorial! Be sure to request more, and as usual, if you have any questions about this tutorial, feel free to leave a comment!
NOTE 1: It is required that you test this movie out with two different clients, because if you test it with one and send it to your own username, nothing will happen. When you send an object, the server sends it to everyone in the room except yourself.
To start off this post, I'm going to tell you this: I plan to start updating this site much more as time passes by. I'd also like to apologize for not posting this tutorial sooner than I had expected.
Anyway, let's just jump right on into the tutorial.
In this tutorial, I'll be showing you how to make a "Mod Message" system. I will be using SmartFoxServer objects again because some people requested that in the "Mod Magic" tutorial I did not to long ago.
So, the first thing I want to tell you is that I'm using the SmartFoxSerer avatarChat file for this tutorial, but you can use any file you want. So, let's go ahead and open up the file.
The next thing you will want to do is to skip straight into the "chat" frame (on the avatarChat.fla example file) or whatever frame your users will interact with each other and open up the coding for that frame.
Now, in this area (at the very bottom of all the other coding), we are going to add this coding into our file:
smartfox.onObjectReceived = function(obj, sender) {
if (_global.myName == obj.toUser) { //Only if my name matches the specified one, do the actions below
_root.modMsgMC._visible = true;
_root.modMsgMC.modMsgText.text = obj.myMsg;
}
}
We are also going to go right under that and make a new function named "sendModMessage." So, in order to do that, we need to add this coding under the smartfox.onObjectReceived handler:
function sendModMessage(toUser, myMsg) {
if (toUser != _global.myName) { //If specified user doesn't have my name then
var obj:Object = {}; //Create a new object
obj.toUser = toUser; //Set the .toUser parameter on the object
obj.myMsg = myMsg; //Set the .myMsg parameter on the object
_root.smartfox.sendObject(obj); //Send the object to all users in room
trace("The mod message has been sent to " + toUser + ".");
}
}
Now, if you tested your movie right now, you would see that nothing has changed. So at this moment, adding all that coding hasn't been really useful yet. It's time to change that and tie all that coding together. To do that, first we need to make a button to call the 'sendModMessage' function. You can give the button (or movieclip) any instance name you want.

Now that something is calling the function, we need some visual evidence that it is really being called. So, the next thing to do is to create a movieclip and give it the instance name of 'modMsgMC'. Inside that movieclip, go ahead and create a dynamic text field which will be used as the actual 'message' part of the 'mod message'. Give this text field an instance name of 'modMsgText'.

After you do that, test your movie and you should see that the moderator message is working completely fine.
Now, currently, as you can see from the file your making, the user is being defined by you and cannot change, as well as the message. So, my next objective is to show you how to alter the coding so you can type in the user's name and the message to send to them.
The first the you have to do is create two text fields on the stage. Give them instance names of 'sendTo' and 'msgToSend'.
Now, once that is done, just open up the button coding which calls the sendModMessage function, and change it to this:
on (release) {
_root.sendModMessage(_root.sendTo.text, _root.msgToSend.text);
}
Test your movie with TWO instances, and you should see your moderator message working fine. I didn't show you how to add a close button to the moderator message, but a simple one could have this coding:
on (release) {
_root.modMsgMC._visible = false;
}
Well, that's all for this tutorial! Be sure to request more, and as usual, if you have any questions about this tutorial, feel free to leave a comment!
NOTE 1: It is required that you test this movie out with two different clients, because if you test it with one and send it to your own username, nothing will happen. When you send an object, the server sends it to everyone in the room except yourself.
Source File: Download
Tuesday, March 8, 2011
SmartFoxServer Tutorial: How to Stop Walking on Walls (How to Set Walking Parameters)
Hey everyone.
In this tutorial, as you can most likely tell from the title, I'm going to explain one way to stop people from 'walking on walls', or other places the characters shouldn't be able to walk.
The coding is quite simple to understand in my opinion, but might not be for an absolute beginner. Anyway, shall we get started?
The first thing I did was open up the Flash file, in which for me is the SmartFoxServer avatarChat example file that they provide you with when you download the program.
Once it is open, I quickly skimmed over the coding once again to figure out one quick and easy approach to do this. Anyway, someone once told me (when I was new to SmartFox), that one method to do this was to make the walls unclickable.
So, in a way, we will do just that. So for this method, we are first going to take a look at SmartFoxServer's original coding and alter it just a little.
Take a look at the myMouse.onMouseDown function. Let's go ahead and delete the if (px.......) statement (as well as it's closing bracket), BUT DO NOT DELETE THE CODING INSIDE THE IF STATEMENT, and now test your movie.
You should move somewhere everywhere that you click your mouse. That's not the best thing to do, considering that most games have buttons in them. You may not want your character to walk when the button is pressed. Some people (like me) thinks that is a little annoying. Keep the if statement out of the coding anyway though.
Anyway, now it's time to add in our own coding. What we need to do is to add a function. Add this coding to the very bottom of your frame coding:
Once the coding is added, if you test your movie, you should see nothing has happened since the first time you tested your movie. So, now that we have a function, we need to add some coding somewhere to actually make the call to the function.
So, what you should do now, is create movieclips as either the ground or the wall and make the calls to the function when the movieclip is either hovered, or when you move your mouse out of the selected symbol.
What I did was use a movieclip as the ground and add this coding to it:
Well, now that you have done all that, you can now test your movie. You should be able to click on your movieclip and see your avatar move to the desired place you have clicked.
NOTE 1: This is not the 'best' method to do this as I'm almost sure it will have a couple of glitches in it somewhere along the line. After reading this, if not before, I'm sure you can come up with a way better method for this, as this is mainly for the beginners.
NOTE 2: In my source file, I used the big gray space on the left for my 'ground'.
If you have any questions or comments, feel free to leave them on this post and I will reply to them as soon as I get a chance to!
In this tutorial, as you can most likely tell from the title, I'm going to explain one way to stop people from 'walking on walls', or other places the characters shouldn't be able to walk.
The coding is quite simple to understand in my opinion, but might not be for an absolute beginner. Anyway, shall we get started?
The first thing I did was open up the Flash file, in which for me is the SmartFoxServer avatarChat example file that they provide you with when you download the program.
Once it is open, I quickly skimmed over the coding once again to figure out one quick and easy approach to do this. Anyway, someone once told me (when I was new to SmartFox), that one method to do this was to make the walls unclickable.
So, in a way, we will do just that. So for this method, we are first going to take a look at SmartFoxServer's original coding and alter it just a little.
Take a look at the myMouse.onMouseDown function. Let's go ahead and delete the if (px.......) statement (as well as it's closing bracket), BUT DO NOT DELETE THE CODING INSIDE THE IF STATEMENT, and now test your movie.
You should move somewhere everywhere that you click your mouse. That's not the best thing to do, considering that most games have buttons in them. You may not want your character to walk when the button is pressed. Some people (like me) thinks that is a little annoying. Keep the if statement out of the coding anyway though.
Anyway, now it's time to add in our own coding. What we need to do is to add a function. Add this coding to the very bottom of your frame coding:
function isWalkable(canWalk:Boolean) {
if (canWalk) {
_global.isBusy = false;
useHandCursor = false; //This line is optional!
} else {
_global.isBusy = true;
}
}
Once the coding is added, if you test your movie, you should see nothing has happened since the first time you tested your movie. So, now that we have a function, we need to add some coding somewhere to actually make the call to the function.
So, what you should do now, is create movieclips as either the ground or the wall and make the calls to the function when the movieclip is either hovered, or when you move your mouse out of the selected symbol.
What I did was use a movieclip as the ground and add this coding to it:
on (rollOver) {
_root.isWalkable(true);
}
on (rollOut) {
_root.isWalkable(false);
}
Well, now that you have done all that, you can now test your movie. You should be able to click on your movieclip and see your avatar move to the desired place you have clicked.
NOTE 1: This is not the 'best' method to do this as I'm almost sure it will have a couple of glitches in it somewhere along the line. After reading this, if not before, I'm sure you can come up with a way better method for this, as this is mainly for the beginners.
NOTE 2: In my source file, I used the big gray space on the left for my 'ground'.
If you have any questions or comments, feel free to leave them on this post and I will reply to them as soon as I get a chance to!
Source File: Download
Thursday, March 3, 2011
SmartFoxServer Tutorial: Dynamic Room Creation
Hey everyone!
As you can tell from the title of this post, this tutorial is going to be on dynamic room creation. So, with dynamic room creation, you are able to create new rooms straight from the client, without even restarting the server, unlike adding rooms from the config.xml file.
One disadvantage of creating rooms from the client is that the room is not persistant. To make the room persistant, you would have to use an extension, which isn't all on the client, more on the server than the client. Anyway, let's begin with this short and fast tutorial.
The first thing your going to want to do in this particular tutorial is to go ahead and create the function for our coding. To do this, open up the chat frame coding (I'm using the avatarChat example file) and add this coding to the very bottom of the frame:
Now, that's all for the frame coding. So now we have to figure out a way to call the function. So, as you can see from our function, we need three parameters. So what I did was create three input text boxes and give them an instance name of newRName, newRPass, and newRMax.
Now that we have our text fields setup, we can create a button to actually call the function and execute it. So, make a button (or movieclip as these symbols can both contain button events), and add this coding to the button:
Also, just in case you got confused on what all to add to the stage, here is a picture of what I added to my avatarChat example file:
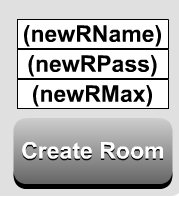
So, that's basically all you needed to add. Once you test your movie, you should see that it works!
NOTE 1: If the new room is empty, it might delete itself (I'm not sure if this is the correct way to say it), but I do know that if no one is in the room and you logout and login again to the avatarChat example file, the room is deleted by itself.
NOTE 2: When the smartfox.createRoom() command is called, I believe it fires the smartfox.onRoomAdded handler.
As you can tell from the title of this post, this tutorial is going to be on dynamic room creation. So, with dynamic room creation, you are able to create new rooms straight from the client, without even restarting the server, unlike adding rooms from the config.xml file.
One disadvantage of creating rooms from the client is that the room is not persistant. To make the room persistant, you would have to use an extension, which isn't all on the client, more on the server than the client. Anyway, let's begin with this short and fast tutorial.
The first thing your going to want to do in this particular tutorial is to go ahead and create the function for our coding. To do this, open up the chat frame coding (I'm using the avatarChat example file) and add this coding to the very bottom of the frame:
function createDynRoom(rName, rPass, rMax) {
var rObj:Object = {};
rObj.name = rName;
rObj.password = rPass;
rObj.maxUsers = rMax;
_root.smartfox.createRoom(rObj);
}
Now, that's all for the frame coding. So now we have to figure out a way to call the function. So, as you can see from our function, we need three parameters. So what I did was create three input text boxes and give them an instance name of newRName, newRPass, and newRMax.
Now that we have our text fields setup, we can create a button to actually call the function and execute it. So, make a button (or movieclip as these symbols can both contain button events), and add this coding to the button:
on (release) {
_root.createDynRoom(_root.newRName.text, _root.newRPass.text, _root.newRMax.text);
}
Also, just in case you got confused on what all to add to the stage, here is a picture of what I added to my avatarChat example file:

So, that's basically all you needed to add. Once you test your movie, you should see that it works!
NOTE 1: If the new room is empty, it might delete itself (I'm not sure if this is the correct way to say it), but I do know that if no one is in the room and you logout and login again to the avatarChat example file, the room is deleted by itself.
NOTE 2: When the smartfox.createRoom() command is called, I believe it fires the smartfox.onRoomAdded handler.
Source File: Download
Monday, February 28, 2011
SmartFoxServer Tutorial: "Mod Magic" Tutorial (Sending Objects)
Hello everyone!
I'm finally back to posting as you can see. I've been really busy with a game I'm working on and other things so I haven't had time to check the blog. Anyway, let's get started on the "Mod Magic" tutorial, or as I like to call "Mod Magic", SmartFoxServer objects.
This technique is very simple to learn, and I'm going to try to explain what each line does carefully enough so that a beginner can understand it, much like the SmartFoxserver Docs already does. Anyway, let's begin now.
First off, I'm using the provided SmartFoxServer avatarChat example file for this tutorial, just like all my other tutorials. So, open your Flash file up and go to the frame you want to add your Mod Magic and open the actions for that frame.
On the SmartFoxServer avatarChat file, I went to the chat frame and added this coding at the very bottom of all the other actions in the movie:
Now, the first line should tell you that we need to create a symbol in our Flash file. So, what I did was create a very simple rectangle shape and wrote some words on it and made it a movieclip by selecting it and converting it to a symbol by right clicking and choosing the "Convert to Symbol..." option. I gave it the instance name of "showM1", which, for me, stands for "showMagic1."
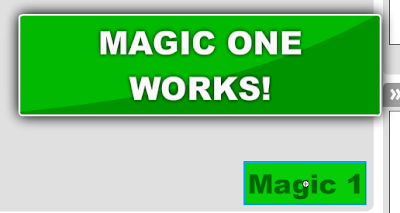
Now, the next thing to do is to create the doMagic() function, which basically perfoms the magic on the sender's side, then send the magic to all the other clients. So, now we need to create a button or movieclip to call the function. I chose a button. On the button I added this coding:
The next and final thing to do is to setup the smartfox.onObjectReceived handler, which is in the coding above. So now you are able to test your movie. You should be able to see that when a user clicks the button, it shows your "Mod Magic."
NOTE: When the smartfox.sendObject() command is called, since your user is the sender of the object, the object will not be broadcasted to you, so you have to make a code so it shows the mod magic on the sender's side as well, which is exactly what we did.
If you have any questions or comments, please leave them on this post and I'll get back to you as soon as I can!
I'm finally back to posting as you can see. I've been really busy with a game I'm working on and other things so I haven't had time to check the blog. Anyway, let's get started on the "Mod Magic" tutorial, or as I like to call "Mod Magic", SmartFoxServer objects.
This technique is very simple to learn, and I'm going to try to explain what each line does carefully enough so that a beginner can understand it, much like the SmartFoxserver Docs already does. Anyway, let's begin now.
First off, I'm using the provided SmartFoxServer avatarChat example file for this tutorial, just like all my other tutorials. So, open your Flash file up and go to the frame you want to add your Mod Magic and open the actions for that frame.
On the SmartFoxServer avatarChat file, I went to the chat frame and added this coding at the very bottom of all the other actions in the movie:
_root.showM1._visible = false;//Hides magic at start
function doMagic(magicName:String) {
var sfsObj = {}; //Makes new object
sfsObj.magicName = magicName;//Adds to object
_root.smartfox.sendObject(sfsObj);//Sends object
if (magicName == "magic1") {//Shows on sender's side
_root.showM1._visible = true;//Shows on sender's side
}//Shows on sender's side
}
smartfox.onObjectReceived = function(o:Object) {
if (o.magicName == "magic1") {//If magicName == magic1
_root.showM1._visible = true;//Show the mod magic to other people, not you
}
}
Now, the first line should tell you that we need to create a symbol in our Flash file. So, what I did was create a very simple rectangle shape and wrote some words on it and made it a movieclip by selecting it and converting it to a symbol by right clicking and choosing the "Convert to Symbol..." option. I gave it the instance name of "showM1", which, for me, stands for "showMagic1."

Now, the next thing to do is to create the doMagic() function, which basically perfoms the magic on the sender's side, then send the magic to all the other clients. So, now we need to create a button or movieclip to call the function. I chose a button. On the button I added this coding:
on (release) {
_root.doMagic("magic1"); //Calls function
}
The next and final thing to do is to setup the smartfox.onObjectReceived handler, which is in the coding above. So now you are able to test your movie. You should be able to see that when a user clicks the button, it shows your "Mod Magic."
NOTE: When the smartfox.sendObject() command is called, since your user is the sender of the object, the object will not be broadcasted to you, so you have to make a code so it shows the mod magic on the sender's side as well, which is exactly what we did.
If you have any questions or comments, please leave them on this post and I'll get back to you as soon as I can!
Source File: Download
Thursday, February 3, 2011
SmartFoxServer Tutorial: Extensions Introduction
Hey everyone!
I first would like to say I'm sorry for not updating the site as much as I have been. I'm going to try to get back to updating it more often, now that I am introducing you to extensions.
Anyway, extensions are VERY useful in SmartFoxServer. They can be used for various things, such as a kick user extension and a ban user extension. Those are the two most common extensions I see asked for in the SmartFoxServer Forums, so eventually, I'll post tutorials on these two extension. But for now, I'm going to introduce you to extensions.
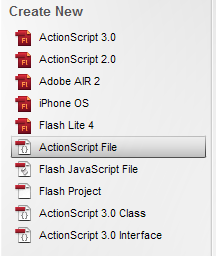
First of all, we are going to write a 'Hello world!' extension. The first step in doing this is to setup the extension's ActionScript file. So, open up Flash, and click the Create New -> ActionScript file option.
After the ActionScript file is opened, we have to create the SmartFoxServer extension layout, as I call it. SmartFoxServer ActionScript extensions always contain a minimum of four required functions, which are: init, destroy, handleRequest, and handleInternalEvent.
To setup these functions I am going to add this coding to my ActionScript file:
Now that the default functions have been created, we can start writing our extension.
Since this is going to be a very simple 'Hello world!' extension, we aren't going to be writing much more coding than what has already been written above. So, here is what the rest of the extension will look like:
As I said, not much more coding than what has already been written. Basically, it is just a couple of trace statements and two if() statements. The comments I added in the script can be taken out, but they are in there just so you know what each line of coding does.
Now all we need to do is save the file and add the extension in the config.xml file. So, save the file to the directory {sfs-installation}/Server/sfsExtensions. Make sure the file name is "simpleExtTut" and make sure the file type is a '.as' file type.
To add the extension into the config.xml file, first we need to open the config.xml file up. Open up your favorite text or XML editor (maybe Notepad or WordPad), and open your config file, which should be located in in the directory {sfs-installation}/Server/config.xml.
Now that your config file is opened up, since I'm using the avatarChat example file, the zone I need to add this extension to is the simpleChat zone. So, after I scroll down and find the simpleChat zone, I will come across the
Now save your config.xml file.
The next thing to do, is to work on the client side (the Flash file). In my Flash file, I'll be using the SmartFoxServer avatarChat example file, as usual. After you open your Flash file, create a button or a movieclip which will call the extension.
After the button or movieclip has been created, add this coding to it's actions:
All that coding does is tell Flash to send SmartFoxServer an extension request to the extension name "simpleExtTut" and make the command (cmd) equal "simpleCmd" and to send the data from the object dataObj along with the extension request.
Now you can test your movie. This is what your final product should look like:

Well, that's all for this tutorial.
If you have any questions are comments, feel free to leave them in a comment on this post and I'll reply to them as soon as I get a chance!
I first would like to say I'm sorry for not updating the site as much as I have been. I'm going to try to get back to updating it more often, now that I am introducing you to extensions.
Anyway, extensions are VERY useful in SmartFoxServer. They can be used for various things, such as a kick user extension and a ban user extension. Those are the two most common extensions I see asked for in the SmartFoxServer Forums, so eventually, I'll post tutorials on these two extension. But for now, I'm going to introduce you to extensions.
First of all, we are going to write a 'Hello world!' extension. The first step in doing this is to setup the extension's ActionScript file. So, open up Flash, and click the Create New -> ActionScript file option.

After the ActionScript file is opened, we have to create the SmartFoxServer extension layout, as I call it. SmartFoxServer ActionScript extensions always contain a minimum of four required functions, which are: init, destroy, handleRequest, and handleInternalEvent.
To setup these functions I am going to add this coding to my ActionScript file:
function init() {
}
function destroy() {
}
function handleRequest(cmd, params, user, fromRoom) {
}
function handleInternalEvent(e) {
}
Now that the default functions have been created, we can start writing our extension.
Since this is going to be a very simple 'Hello world!' extension, we aren't going to be writing much more coding than what has already been written above. So, here is what the rest of the extension will look like:
function init() {
//This is called when the extension loads (when the server first starts).
trace("Simple extension is starting.");
}
function destroy() {
//This is called when the extension is destroyed.
trace("Simple extension is ending.");
}
function handleRequest(cmd, params, user, fromRoom) {
if (params.simpleParam == "paramOne") { //If statement opener one.
if (cmd == "simpleCmd") { //If statement opener two.
trace("Hello world!"); //Traces 'Hello world!' on the server.
} //If statement two closer.
} //If statement one closer.
}
function handleInternalEvent(e) {
//This is called when any internal event is executed.
trace("Internal event: " + e.name + " was called."); //Traces the internal event that was executed.
}
As I said, not much more coding than what has already been written. Basically, it is just a couple of trace statements and two if() statements. The comments I added in the script can be taken out, but they are in there just so you know what each line of coding does.
Now all we need to do is save the file and add the extension in the config.xml file. So, save the file to the directory {sfs-installation}/Server/sfsExtensions. Make sure the file name is "simpleExtTut" and make sure the file type is a '.as' file type.
To add the extension into the config.xml file, first we need to open the config.xml file up. Open up your favorite text or XML editor (maybe Notepad or WordPad), and open your config file, which should be located in in the directory {sfs-installation}/Server/config.xml.
Now that your config file is opened up, since I'm using the avatarChat example file, the zone I need to add this extension to is the simpleChat zone. So, after I scroll down and find the simpleChat zone, I will come across the
Now save your config.xml file.
The next thing to do, is to work on the client side (the Flash file). In my Flash file, I'll be using the SmartFoxServer avatarChat example file, as usual. After you open your Flash file, create a button or a movieclip which will call the extension.

After the button or movieclip has been created, add this coding to it's actions:
on (release) {
var dataObj:Object = {};
dataObj.simpleParam = "paramOne";
_root.smartfox.sendXtMessage("simpleExtTut", "simpleCmd", dataObj);
}
All that coding does is tell Flash to send SmartFoxServer an extension request to the extension name "simpleExtTut" and make the command (cmd) equal "simpleCmd" and to send the data from the object dataObj along with the extension request.
Now you can test your movie. This is what your final product should look like:

Well, that's all for this tutorial.
If you have any questions are comments, feel free to leave them in a comment on this post and I'll reply to them as soon as I get a chance!
Monday, January 24, 2011
SmartFoxServer Tutorial: Chat Log
Hello everyone!
It's been a while since I posted on this site. I'm sorry about that, I've just been a little busy on a new project I'm working on. Anyway, as you can tell from the post title, this tutorial is on how to create a chat log. The chat log we create in this tutorial will have an auto-scrolling feature. Anyway, let's get started!
First things first, I'm using an avatarChat example file from SmartFoxserver. So, let's go ahead and open that file up.
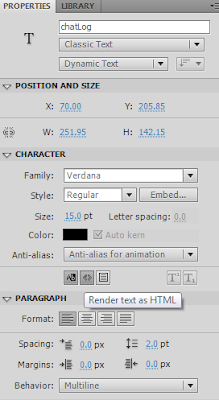
After the file is opened, go to the 'chat' frame and put a dynamic text box on the stage and give it an instance name of chatLog and make sure you tick the box shown below so that it has HTML abilities.
After you do that, you need to open up the 'chat' frame's coding. After the coding is up, scroll down until you find a SmartFoxServer handler called "smartfox.onPublicMessage." Add this coding inside that handler:
//New Chat Log Coding:
//--Basic Add Message Coding:
chatLog.htmlText += user.getName() + ": " + msg + newline; //Add text to textbox
//--Basic Auto-Scroll Coding:
var logVar = 1; //Creates a variable, you might want to increase this
chatLog.scroll = logVar; //Scrolls textbox to variable amount
logVar++; //Increases variable value
Pretty basic coding, as you can see. Here is an image of where I added that coding in my Flash file:
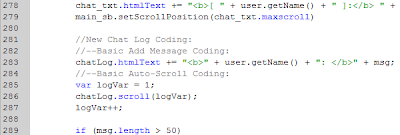
(Coding in the image isn't correct, use the coding as shown above!)
Well, after you do that, test the movie and it should be working fine.
If you encounter any problems with this be sure to leave a comment and I'll get back to you as soon as I can.
Source File: Download
Subscribe to:
Posts (Atom)